Celebrate in Layers: The Magic of a 3D Shadow Box Happy Birthday Big Cake
There is something undeniably special about handing someone a gift that they have to look at from different angles to fully appreciate. In a world dominated by flat screens and digital greetings, the tactile experience of paper crafting offers a refreshing return to tangible creativity. Among the most trending projects in the crafting community right now is the 3D Shadow Box Happy Birthday Big Cake. This isn't just a card; it is a miniature stage set, a captured moment of celebration encased in a frame, and a testament to the power of layering.
For crafters looking to elevate their gifting game or decorate a party space with something unique, understanding the mechanics and potential of this multi-layered design is key. Whether you are a seasoned silhouette user or someone who prefers the meditative rhythm of an art knife, this project bridges the gap between professional design and handmade heart.
Deconstructing the Design: Why Five Layers Make the Difference
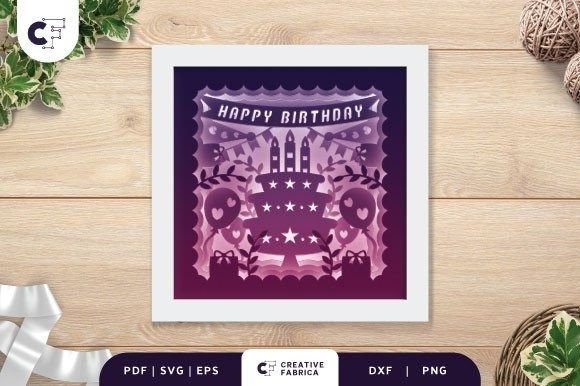
The core appeal of the 3D Shadow Box Happy Birthday Big Cake lies in its depth. Unlike traditional scrapbooking where elements might be popped up with foam tape for a slight effect, a true shadow box relies on distinct, separated planes to create a sense of distance and reality. This specific template utilizes a 5-layer square paper cutting design, which is the sweet spot for achieving significant depth without making the final assembly too bulky for standard frames.
Each layer serves a specific visual function. The background layer sets the scene, perhaps featuring subtle patterns or a solid color that allows the foreground to pop. As you move forward through the layers, you encounter the structural elements of the "big cake," the festive banners, and finally, the bold "Happy Birthday" typography that anchors the composition. When assembled correctly with spacers between each sheet, light and shadow play across the cutouts, giving the cake a voluminous, almost edible appearance despite being made entirely of paper.
This layering technique mimics the way our eyes perceive depth in the real world. It transforms a static image into a dynamic vignette. For birthday decorations, this means the piece draws the eye immediately, inviting guests to lean in and inspect the details of the frosting swirls, the candles, and the celebratory text.
Versatility in File Formats for Every Crafter
One of the greatest strengths of modern digital crafting templates is accessibility. You do not need to be a graphic designer to create professional-looking art. The 3D Shadow Box Happy Birthday Big Cake template is typically available in a comprehensive suite of formats, ensuring that no matter your toolset, you can bring this project to life.
- SVG: The gold standard for electronic cutting machines. If you own a Silhouette Cameo, Cricut Explore, or Maker, this file type allows you to send the design directly to your machine for precise, automated cutting.
- PDF & EPS: Ideal for those who prefer printing the template out to use as a physical guide. These vector-based formats ensure that lines remain crisp regardless of how much you scale the image up or down before printing.
- PNG & DXF: These offer compatibility with a wider range of software and older cutting machines, ensuring that technical limitations never stop your creativity.
It is important to note that while machines offer speed and precision, they are not a requirement. If you do not have access to a digital cutter, you can absolutely use an art knife and a pair of sharp scissors. Hand-cutting the layers adds a personal, organic touch to the project. While it requires more patience, the result is uniquely yours, bearing the slight imperfections that prove it was made by human hands.
From Wall Art to Glowing Centerpiece: Two Ways to Display
The functionality of this shadow box extends beyond simple decoration. Depending on how you assemble it, you can tailor the final product to suit the recipient's environment or the specific needs of the party venue.
Option A: The Framed Wall Decoration
The most classic application is mounting the finished layers into a deep-set frame. This creates a permanent piece of wall art that the birthday person can hang in their home or office long after the cake has been eaten. To achieve this, you will need glue or double-sided tape to adhere the layers to one another. Foam adhesive strips are particularly effective here, as they provide consistent spacing between the five layers, maximizing the shadow effect. Using high-quality cardstock ensures the paper doesn't bow or warp over time, keeping the "cake" looking fresh and structured.
Option B: The Illuminated Light Box
For a truly show-stopping effect, consider transforming the 3D Shadow Box Happy Birthday Big Cake into a light box. By adding LED strip lights between the layers during assembly, you change the entire mood of the piece. The light filters through the negative spaces of the cut paper, highlighting the intricate details of the banner and the cake tiers.
This version makes for an incredible nightlight for a child's room or a dazzling centerpiece for an evening birthday party. The glow emanating from within the box gives the paper a warm, ethereal quality that flat decorations simply cannot match. It turns a static craft into an interactive lighting fixture, proving that paper crafts can hold their own alongside more expensive decor items.
Material Matters: Choosing the Right Cardstock
The success of any paper layering project hinges on the material used. Flimsy paper will sag between the layers, destroying the illusion of depth and making the assembly process frustrating. For the 3D Shadow Box Happy Birthday Big Cake, stiffness and durability are paramount.
Experienced crafters recommend using Encore Cardstock 80 lb cover (216 gsm). This weight is substantial enough to hold its shape when suspended in a frame yet thin enough to be cut cleanly by most machines or knives. The 12x12 inch size is standard for these templates, fitting perfectly into common shadow box frames found at craft stores.
When selecting colors, think about contrast. Since this is a birthday theme, vibrant colors often work best, but the legibility of the "Happy Birthday" text against the background layers is crucial. If you are building the light box version, lighter colored cardstock will allow more light to pass through, creating a softer glow, whereas darker cards will create dramatic silhouettes.
Click here to visit the 12×12 Cardstock Shop to find the perfect hues for your project. (Note: This is a paid link at no extra cost to you, supporting the creation of more free templates and tutorials).
Making It Personal: A Gift with Meaning
In an era of mass-produced greeting cards, a handmade shadow box carries significant emotional weight. It signals to the recipient that you invested time, thought, and effort into their celebration. The 3D Shadow Box Happy Birthday Big Cake is versatile enough to be customized further. You can swap out the background colors to match the birthday person's favorite shade, or even add small embellishments like glitter or sequins to the "frosting" layers before assembling the box.
It serves as a wonderful gift for friends, family members, or colleagues. Because it is framed, it feels like a piece of art rather than a disposable card. For children, the light-box version doubles as a toy and a nightlight. For adults, the sophisticated layering acts as elegant home decor. It fits seamlessly into modern lifestyles where people value experiences and personalized touches over generic store-bought items.
Assembly Tips for a Professional Finish
Regardless of whether you cut by machine or hand, the assembly phase is where the magic happens. Here are a few practical considerations to ensure your shadow box looks polished:
- Test Fit First: Before applying any glue, stack your five layers in order inside the frame to check the fit. Ensure no edges are catching on the frame lip.
- Consistent Spacing: Use uniform spacers (foam tape or pre-cut chipboard squares) between every layer. Inconsistent spacing can make the image look tilted or distorted.
- Clean Cuts: If using a knife, take your time on the inner corners of the design. A clean cut ensures that light passes through smoothly if you are making a light box.
- Dust Control: Once assembled, seal the back of the frame tightly to prevent dust from settling between the layers, which can be difficult to clean later.
The 3D Shadow Box Happy Birthday Big Cake represents the perfect intersection of technology and tradition. Whether you leverage the precision of an SVG file and a Cricut machine or embrace the slow craft of hand-cutting with scissors, the end result is a beautiful, dimensional tribute to celebration. It reminds us that sometimes, the best way to honor a special day is to build it layer by layer, creating something that stands out from the crowd and lasts long after the party is over.